How to create a professional WordPress website in a day
There are tons of tutorials on how to create a WordPress website in the internet. In contrast to most other tutorials, this guide is not only about design but also about all the little things that make a website great.
The basic setup of the Website
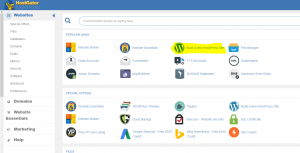
1. The two most basic things that you need are a domain (website name) and a webspace. If you are a beginner I suggest you to get a webspace with an automatic wordpress installer. I can recommend Hostgator if you can get a discounted offer. However, don’t buy the domain there (more details in the next step). I picked a cloud hosting plan with unlimited domains, which runs fast and allows me to have multiple websites for one price. The installation is very easy. After you logged in, just click on “Launch Cpanel”. Now you see the webspace administration settings. Click on “Build a new WordPress website” and it will guide you through the quick installation. If you can have unlimited websites and you want to add a new one go to “Addon Domains” in the Cpanel to install a new folder for the website.
2. I wouldn’t buy the domain together with the webspace because otherwise the webspace provider owns the name. Let’s say your website became popular and you want to change the webspace because Hostgator no longer offers you discounted prices. This would be hard if they own your name. On the other side, if you own the name the migration is easy. For the domain I recommend Freenom as they offer very cheap prices and a free WHOIS privacy protection.
3. To link the webaddress to your WordPress installation, copy the nameserver information on the lower right side of the “Cpanel”. On Freenom go to Services>My Domains>Manage Domain>Management Tools>Nameservers and paste the nameservers from Hostgator. Then you need to wait for up to 72 hours until all internet browsers are informed that the address points to your WordPress installation. Great, you can now start building the website.
Prepare WordPress for greatness
4. Go to yourdomain.com/wp-admin to log in to the WordPress settings dashboard. Here you have all the options to create the website of your dreams. If you hover over the house on the top left, there is an option to see the website as a visitor would see it. The installation comes with a few plugins preinstalled. You can uninstall all of them.
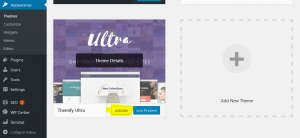
5. WordPress takes care of all the functions in the background. For the visual representation of the information you need a theme. Simple themes can be downloaded for free in the WordPress store. However, I suggest you get a paid premium theme, as they generally offer more options and better designs. I use Themify Ultra and I can recommend it for anyone who wants a professional website but doesn’t have much coding knowledge. You can buy it at Themify.me. I asked them for a discount on the lifetime membership and they gave me 40% off. This is a good one time investment as it allows me to install the GPL themes on any website. To upload it go to Appearance>Themes and click “Add New” on top. You can now upload the zip folder from your pc to install the theme. Click on activate and it is ready. There will be a note that you need to install a framework plugin. Just click on install and then activate it.
6. If you want to make code changes to the theme that persist when the theme is updated, you can create a child theme with the plugin “Child Theme Configurator”. Most beginners won’t need this but if you later decide to add a code snipped you are already prepared as it is easier to do this in the beginning. To install a plugin for WordPress go to the menu section “Plugins” and click on “Add New” on the top. This time you can search the free WordPress store instead of uploading a zip file. When you installed the Child Theme Configurator, go to Tools>Child Themes and select “Create a child theme”. Pick the Ultra theme, click on “Copy Menus, Widgets, …” and proceed. Then activate the new Ultra child under Appearance>Themes.
7. The next plugin is very important and should be installed as soon as possible (of course you can also get another one with similar functions). The plugin is WP Cerber Security and it protects you from robots that try to break into your website. It blocks an IP address after some false password entries. On my website it registers hundrets of failed attempts each week.
8. Here is a short list of essential plugins:
- Themify Shortcodes: Shortcodes that are required for some of the demo pages. It can help you to add elements with a few words (see documentation).
- WP Cerber Security: WP Cerber lets you limit login attempts. It will block an IP after some failed attempts. Also, there is a basic spam protection and it can block certain code injection attacks.
- Really Simple SSL: This plugin helps you to activate the ssl functions of Hostgator (make your address https and protects the privacy of visitors).
- Contact Form 7: Enables you to create simple contact forms with spam protection (Google Captcha or a quiz).
- Yoast SEO: The Yoast plugin helps you to create articles that appear often in search engines (e.g. Google). It will add an widget on the bottom of the post editor with tips on how you can improve the current article.
- Slimstat: If Google Analytics is to complicated for now, you can simply install Slimstat in WordPress. It helps you to track the visitors in alignment of the EU privacy regulation
9. In order to make the post links look better, you should go to Settings>Permalinks and change it to “Post Name”. This removes silly numbers and it uses the name of the post instead. You should also change the tagline (subtitle of the website) under Settings>General. If you want that search engines not yet show your unfinished website in the results, you can change this under Settings>Reading. You can even go furter and install a “coming soon” page with the plugin IgniteUp.
Give your WordPress Website a beautiful look
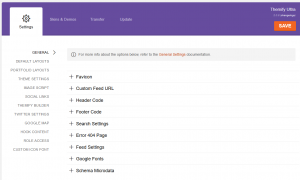
Now for the visual appearance you can benefit a lot from the Ultra Theme. Themify has a clearly arranged settings page in the backend for the general setup of the theme. Further, if you click on Appearance>Customize you can change design options for the whole website while instantly seeing the results.
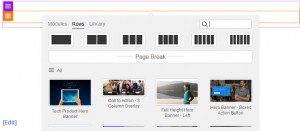
If you want to design a specific post or subpage you can use the Themify Builder, which can be started by clicking the button on the top of the post editor. The builder helps you to instantly create popular graphical elements. The purple box represents the row and the orange boxes are the columns inside the row.
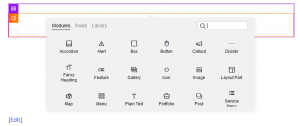
You can even use preconfigured demo sections as a starting point and if you have created an complex element you can save it in a library for future use.